If so, then you aren’t alone. This is a common problem due to the default settings that Excel employs when you create a hard copy of a spreadsheet. Repeating the top row on every page when you print in Excel is a great way to make the data easier to read. You can use these steps to display the top row on every page in Excel 2010.
How to Automatically Print the Top Row on Every Page in Excel
While it would be nice to only work with Microsoft Excel 2010 on a computer, it’s probable that the spreadsheets you create in that program will have to be printed out for someone. Want to keep some of your rows locked at the top of the screen? Our how to freeze three rows in Excel guide can show you how to do it. There aren’t really any foreseeable problems with the situation when dealing with a single page spreadsheet, but multiple page spreadsheets can be tricky when they’re printed on paper, specifically if the spreadsheet has a lot of columns. To simplify the experience for your spreadsheet readers, consider setting your page options to display the top row, with all of your column labels, at the top of every spreadsheet page. That way they won’t be confused about which column contains what data, thereby preventing them from needlessly going back to the first page of the spreadsheet and matching up columns. Our guide below will show you how to adjust a setting in Excel 2010 so that you can automatically include the top row on every page in Excel 2010. For additional information on this Excel setting, including answers to other questions that you may have, you can read our repeat rows in Excel guide.
How to Repeat the Header Row at the Top of Every Page in Excel 2010 (Guide with Pictures)
The steps in this article were performed in Microsoft Excel 2010, but also work in most other versions of Microsoft Excel.
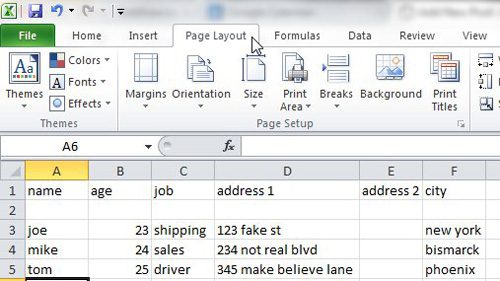
Step 1: Click the “Page Layout” tab at the top of Excel 2010.
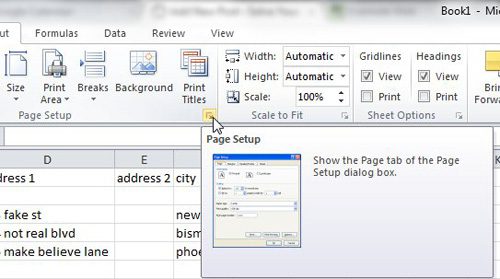
Step 2: Click the small box to the right of “Page Setup” in the ribbon at the top of the window.
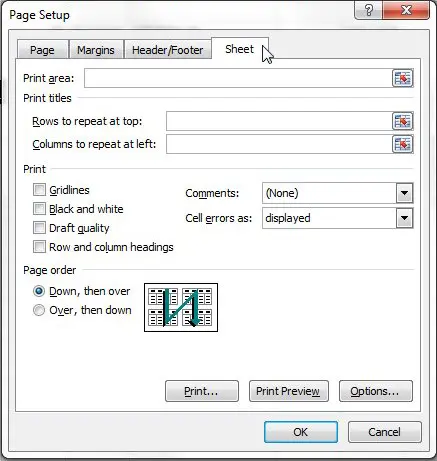
Step 3: Click the “Sheet” tab at the top of the “Page Setup” pop-up window.
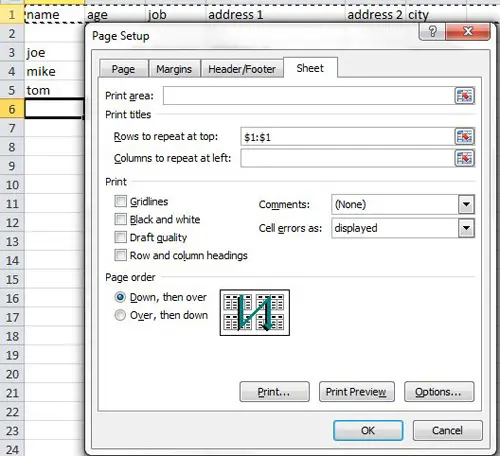
Step 4: Click inside the empty field to the right of “Rows to repeat at top,” then click the row number that you want to repeat at the left side of the window.
In the example picture below, for example, I am repeating row “1.”
Step 5: Click the “OK” button at the bottom of the pop-up window to apply your changes.
Now that you know how to print the top row on every page in Excel you will be able to make it much easier for people to read your multiple-page spreadsheets. Alternatively, you can repeat the top row on every page in Excel by going to Page Layout > Print Titles. This will open directly to the Sheets menu from step 4 above where you will be able to click inside the Rows to repeat field then click the row number. Note that this will only affect the appearance of your spreadsheet when you print. The top row will not be repeated multiple times throughout the data when viewing it on a computer screen. If you would like to keep the top row visible as you scroll through the spreadsheet, then you can do so by freezing the top row. This is accomplished by going to View > Freeze Panes > Freeze Top Row. Adjusting that setting won’t affect the printed spreadsheet. When you print out your spreadsheet after this, then row that you selected in step 4 will be at the top of every printed page.
See also
How to subtract in ExcelHow to sort by date in ExcelHow to center a worksheet in ExcelHow to select non-adjacent cells in ExcelHow to unhide a hidden workbook in ExcelHow to make Excel vertical text
After receiving his Bachelor’s and Master’s degrees in Computer Science he spent several years working in IT management for small businesses. However, he now works full time writing content online and creating websites. His main writing topics include iPhones, Microsoft Office, Google Apps, Android, and Photoshop, but he has also written about many other tech topics as well. Read his full bio here.
You may opt out at any time. Read our Privacy Policy


