Flattening a Photoshop File in CS5
It’s a good idea to save your flattened image with a different file name so that you don’t overwrite the original layered file. That way if you need to make a change to the image you won’t need to try and fix it on the single-layered, flattened file, which can be next to impossible in some situations. Step 1: Open your file in Photoshop. Step 2: Note the multiple layers in the Layers panel.
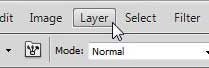
Step 3: Click Layer at the top of the window.
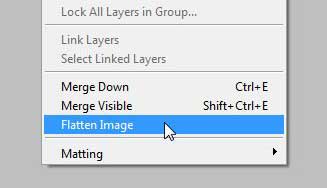
Step 4: Select the Flatten Image option at the bottom of the menu.
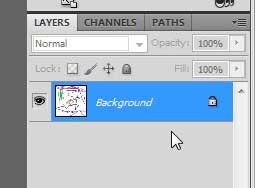
Step 5: You will notice that the Layers panel now shows just one layer, into which all of your previous layers have been combined.
Step 6: Click File at the top of the window, click Save As, then enter a new file name so you don’t overwrite the original, layered file. If you need to unlock the background layer created by flattening the image, you can read this article to learn how. After receiving his Bachelor’s and Master’s degrees in Computer Science he spent several years working in IT management for small businesses. However, he now works full time writing content online and creating websites. His main writing topics include iPhones, Microsoft Office, Google Apps, Android, and Photoshop, but he has also written about many other tech topics as well. Read his full bio here.
You may opt out at any time. Read our Privacy Policy