But once the slides themselves are ready to show, you often need to make some formatting changes to the presentation so that it is easy for others to navigate or absorb. One such item that you might consider is using slide numbers. This makes it easier for you to keep your own place, but it also helps your audience make notes or remember where a specific bit of information was. You can add slide numbers to a Google Slide slideshow by going to Insert > Slide numbers > then checking the On option and clicking Apply. Page numbers are important and often a requirement for documents that you create in programs like Google Docs or Microsoft Word, but they can be very helpful for other types of documents as well. In the case of presentations in Google Slides it can help you keep on track if you are working off a printed version of the presentation, or they can serve as a helpful reference point on the displayed slides if you are presenting digitally. While you may have previously added slide numbers manually, it can be difficult to keep them up to date if you are adding new slides or deleting old ones. Fortunately, you can add a slide number element in Google Slides that will update automatically and help to ensure that your numbering remains accurate.
How to Add Slide Numbers in Google Slides
Our guide continues below with additional information on numbering Google Slides presentations, including pictures of these steps.
How to Add Page Numbers in Google Slides (Guide with Pictures)
The steps in this article were performed in the desktop version of Google Slides. This is going to add a page number to every slide in your presentation. If you include additional slides or remove any slides after adding page numbers (such as you could do by following this guide), then the page numbers will adjust accordingly.
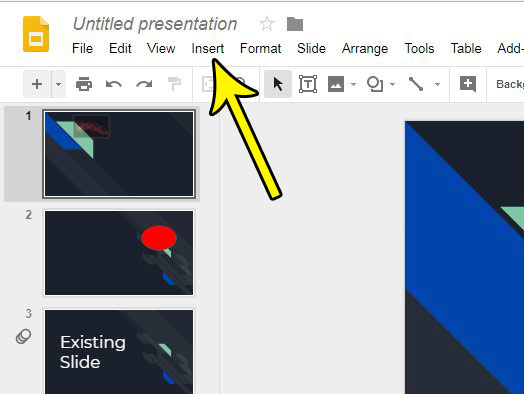
Step 1: Sign into your Google Drive account and open the Google Slides file to which you want to add slide numbers.
Step 2: Select the Insert tab at the top of the window.
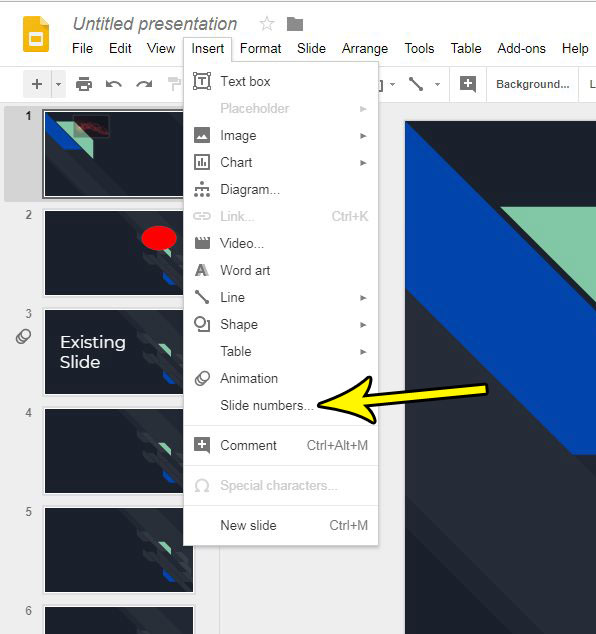
Step 3: Click the Slide numbers option near the bottom of this menu.
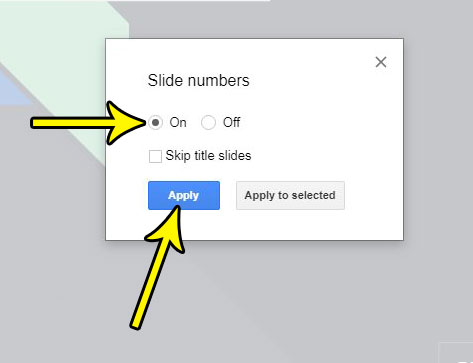
Step 4: Select the circle to the left of On, then click the Apply button.
Note that you can also elect to skip title slides if you so choose. Our tutorial continues below with additional discussion on slide numbers in a Google Slides slideshow.
More Information on How to Add Page Numbers in Google Slides
You will notice that there is also an “Apply to selected’ button that is on this dialog box. If you select some of the slides in your presentation before going to Insert > slide numbers, then you enable the slide numbers and click Apply to selected, then Google Slides will only add numbers to the slides that you selected. If you decide later that you want to remove the numbers from your slides then you simply need to return to the Slide numbers dialog box and choose the Off option on that menu. You might be curious on why there is a specific option to skip a title slide on this menu. When you are creating a Google Slides presentation and you know that you have a particularly discerning audience, then you might want to maximize the effectiveness of the information that you are presenting. While slide numbers are useful on almost all the slides in a presentation, they can be distracting on a title slide that could be on screen for a long time while you are waiting to begin a presentation. If you want to use this setting that you will need to go to your slide master at Slides > Edit theme and select one of the slides there to be the “title slide” if you don’t have one already. You can then select a slide in your presentation that you want to make a title slide, then click Slide > Apply layout > Title slide. As with most other changes that you might need to make in Google Slides you can apply this to multiple slides at once by holding down the Ctrl key to select more than one slide, then perform the desired action to make a change to each of those selected slides. Is there a slide in your presentation that you don’t need to show for a particular audience? Find out how to skip a slide in Google Slides so that you don’t show the slide, but can keep it in the event that you need it in the future.
Additional Reading
He specializes in writing content about iPhones, Android devices, Microsoft Office, and many other popular applications and devices. Read his full bio here.


