Microsoft Excel 2010 gives you a significant number of ways to alter how your data is displayed on-screen or on a printed document. One common method for changing how a spreadsheet prints is by adjusting the orientation of the sheet. This is the change that you need to make when you want to print a page horizontally in Excel 2010. The actual term for horizontal printing in Excel 2010 is the “landscape” orientation, and it allows you to fit more columns on one sheet while you are printing. Continue reading to learn more about printing horizontal pages in Excel 2010.
How to Print a Page Horizontally in Excel 2010
Our article continues below with additional information on printing landscape in Excel, including pictures of these steps.
How to Change Print Orientation and Print Excel Landscape (Guide with Pictures)
Changing the print orientation in Excel 2010 using the method outlined below will only change the orientation for the current document. The default orientation will remain at the vertical, or “portrait” setting. It will also be applied to every page in your worksheet. Note, however, that you will need to change the orientation for each worksheet in your workbook if you want to print every worksheet horizontally.
Step 1: Open the spreadsheet that you want to print horizontally in Excel 2010.
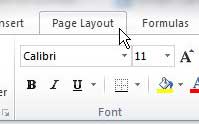
Step 2: Click the Page Layout tab at the top of the window.
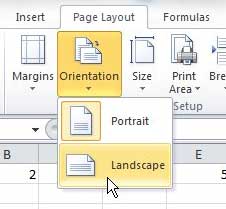
Step 3: Click the Orientation drop-down menu in the Page Setup section of the ribbon at the top of the window, then click the Landscape option.
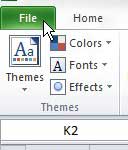
Step 4: Click the File tab at the top-left corner of the window.
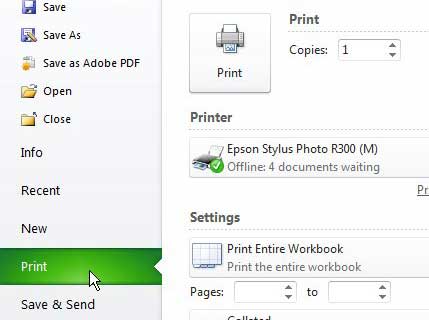
Step 5: Click Print in the column at the left side of the window, then click the Print button at the top of the window.
Note that you can also quickly access this print menu from your spreadsheet at any time by pressing Ctrl + P.
How Do I Change My Excel Page Orientation from Portrait to Landscape Orientation?
While the steps in this guide are focused mainly on adjusting settings in Excel so that you print your spreadsheet in horizontal or landscape mode, you are also going to be changing the display orientation of the spreadsheet as well. When you select the Orientation dropdown menu in the Page Setup group on the ribbon, or through the Page setup dialog box, the chosen setting will apply to the single page that is currently selected. if you want to apply it to multiple worksheets in your Excel workbook, then you will either need to change this setting on other sheets as well or take an additional action. If you hold down the Ctrl key on your keyboard and select multiple sheets by clicking the tabs at the bottom of the window then you will change the orientation of every selected worksheet. This method of selecting multiple sheets can be applied to the entire workbook if you right-click one of the tabs and choose Select All Sheets. Additionally, when you select Print from the Print menu you will print active sheets, not just the one that’s visible. So if you have multiple worksheets selected you can print all of them at the same time.
More Information on How to Print Landscape in Excel
Alternatively you can click the small dialog box at the bottom-right of the Page Setup section of the ribbon, which will open a new Page Setup pop-up menu. Here you can select the page orientation as well.Microsoft Word allows you to change your page orientation in a similar way. If you change the page orientation of a Word document, it’s also updated on the screen, allowing you to see how your printed document will look without navigating to the Print menu.When you switch your Excel spreadsheet to landscape mode, more of your columns are going to fit on each printed page, but fewer rows are going to fit on each page. If you are relying on your printed layout including specific rows on the same page, then it’s helpful to check the Print Preview section in the Print dialog box menu that you open from the File menu or by pressing Ctrl + P on your keyboard.Google Sheets also allows you to print horizontally, and actually does so by default. If you want to print in Portrait mode in Google Sheets then you will need to adjust that setting by going to File > Print and choosing the Portrait orientation option at the right side of the window.While you are on the Print setup menu in Excel you can change a number of other helpful print settings as well. For example, if you click the No Scaling button you can have Excel automatically fit your rows, columns, or even the entire sheet to one page. This can help to eliminate a lot of the frustrations that occur when printing in Excel.
Once you have chosen the desired orientation you may want to adjust other settings as well. For example, you might want to use custom page breaks to split up your data in specific groups. You can do this by selecting a column or row, then clicking the Page Layout tab, and choosing the Page Break option from the Breaks menu. You may also want to adjust the Page Margins from the Page setup group, or you might want to define a print area if you only want to print some of your data. You can use the Workbook Views group on the View tab to toggle between different view modes and see how your worksheet data will look before you waste ink and paper creating a physical copy of the spreadsheet. If your spreadsheet is still extending off the side of your page, you can follow the instructions in this article to automatically have Excel scale your document to fit on one page.
Additional Sources
After receiving his Bachelor’s and Master’s degrees in Computer Science he spent several years working in IT management for small businesses. However, he now works full time writing content online and creating websites. His main writing topics include iPhones, Microsoft Office, Google Apps, Android, and Photoshop, but he has also written about many other tech topics as well. Read his full bio here.


