Unfortunately, the larger the presentation and the more elements you use, the bigger the file. If your PowerPoint presentation file is too big, here are some steps you can take to reduce the overall file size.
Compressing PowerPoint Images
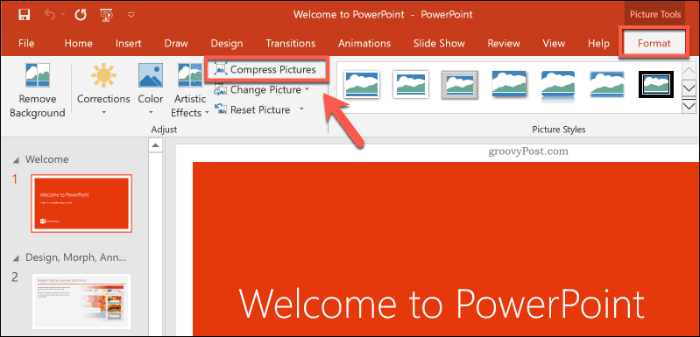
The biggest problem with any PowerPoint presentation isn’t the text—it’s the images. More images mean a bigger file, but you can take some steps to reduce the problem. Reducing image sizes in Office documents will reduce the overall file size, and the best way to do this is by compressing your images. The downside to this is a reduction in image quality. However, PowerPoint does offer several compression options, so you can decide to use better quality images, although the image compression will be reduced as a result. To start, open your PowerPoint presentation. Select an image, then press Format > Compress Pictures in the ribbon bar.
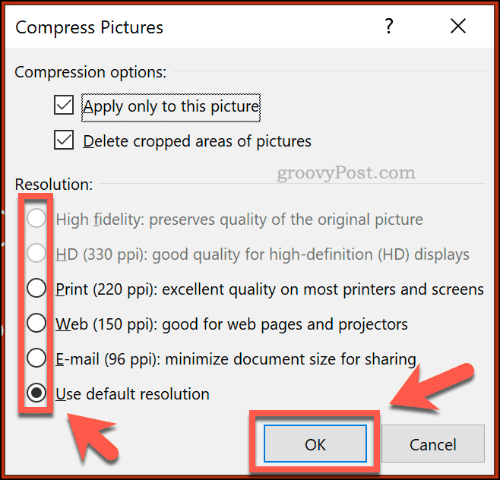
This will bring up the Compress Pictures options box. There are five different image resolution options, including an additional Use default resolution option to leave your images intact. Each resolution is measured in pixels per inch, where the larger the number, the better the quality (and the larger the file size). For maximum compression, select E-mail (96 ppi). If you’d prefer to compress only a single image, leave the Apply only to this picture checkbox checked. If you want to compress all of the images in your PowerPoint presentation at once, make sure to uncheck this option.
Press OK to compress your image (or images) once you’re ready. Once you’ve saved your PowerPoint presentation (File > Save), the file size should be reduced. The impact of image compression on file size will depend on the number of images in your presentation, as well as their original quality.
Compressing Video in PowerPoint
Compressing other media types, like video files, is the next step in reducing your PowerPoint file size. Video files, in particular, can massively increase your PowerPoint files if they’re embedded in your presentation. Thankfully, PowerPoint offers a built-in method for compressing and converting video files. To do this, open your presentation in PowerPoint, then press File > Info > Compress Media. In the drop-down menu, select the quality you wish to use for your embedded video files. You can choose between Full HD (1080p), HD (720p), and Standard (480p) video quality.
If the video files are supported, PowerPoint will automatically compress the media files, reducing their overall quality in the process. Click File > Info > Compress Media > Undo to undo the process if the quality is reduced too far. If you’re happy with the process, save your document (File > Save).
Saving in the PPTX File Format
Most PowerPoint users are familiar with PPT, the PowerPoint file format. Many older PowerPoint presentations are still saved and distributed in this older format. Unfortunately, the PPT file format is obsolete. The replacement, PPTX, uses compression to reduce the file size of PowerPoint presentations vastly. Saving your documents in the PPTX format, as well as converting existing PPT files to PPTX, can have a big impact on overall file size. To convert your PPT file to PPTX, open the PPT file in PowerPoint. From there, click File > Info > Convert.
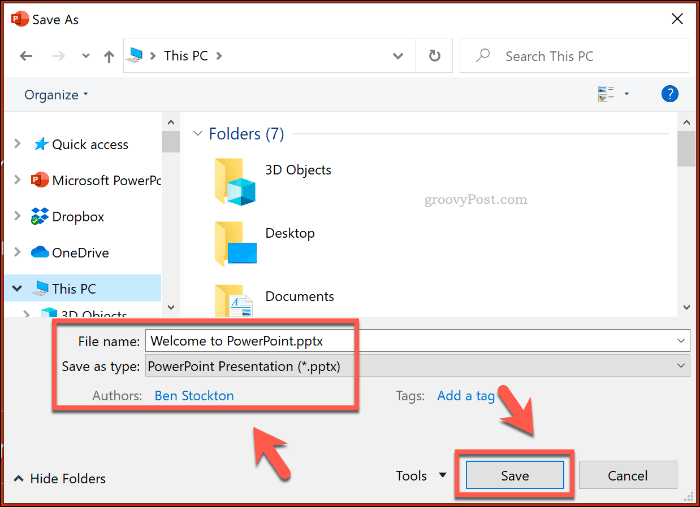
This will open the Save As dialog box, automatically selecting the PPTX file format. Confirm the file name for your new PPTX presentation, then press Save to confirm.
The additional benefits of compression that a PPTX file offers over the original PPT format should help to reduce the file size. However, the impact of saving your PowerPoint presentation as a PPTX file will depend on your original presentation file.
Disabling Embedded Fonts
Most PowerPoint users will use default system fonts for their presentation, but if you’re creating a themed presentation, you may decide to embed third-party fonts into your PowerPoint file. These embedded fonts might look great, but they can increase your PowerPoint file size significantly. Unless you’re certain about including them, you should disable the embedded fonts option in PowerPoint. To do this, click File > Options to open the PowerPoint options menu.
In the PowerPoint Options menu, press the Save tab. Under the Preserve fidelity when sharing this presentation section, click to disable the Embed fonts in the file checkbox.
Once the option is unchecked, click OK to save the setting, then press File > Save to save the document. Once saved, any embedded font files should be removed. However, this is a setting that should only impact a small number of PowerPoint users and may only reduce your PowerPoint file size if you’re using a significant number of custom fonts.
Removing Hidden PowerPoint Data
Every PowerPoint document you create has additional information attached, including who authored it and other hidden metadata. If you’re trying to optimize your PowerPoint file size, removing this information should help to reduce the file size, although the impact should be relatively minor. To do this, open your PowerPoint presentation, then click File > Info > Check for Issues > Inspect Document.
In the Document Inspector window, ensure that the Document Properties and Personal Information checkbox is selected, then press Inspect.
After the Document Inspector has scanned your PowerPoint presentation, click the Remove All button for the Document Properties and Personal Information option.
This will remove all personal metadata from your PowerPoint presentation, reducing the file size by a small amount.
Creating Better PowerPoint Presentations
You don’t need to compromise on quality to create high-quality PowerPoint presentations. If PowerPoint file sizes concern you, compress your media files and use the PPTX file format. If you want to ditch PowerPoint completely, you could think about using Microsoft Sway instead.
![]()


