If you’ve only ever used the default layout, or are accustomed to maybe switching between the standard views, then you may not be familiar with some of the more complex ways that you can customize the look of the Word window. One of the ways that you can edit your document is in a split screen view. This allows you to essentially have your document open twice so that you can view two different parts of it at the same time. You can remove the Word split screen by going to the View tab, then clicking the Remove Split button. There are a lot of different ways to edit documents and work within the Microsoft Word 2013 application. You may be comfortable working with the default settings that are present on new installations in Word 2013, while someone else might like to enable formatting marks, use a different view, or change the default font. Fortunately, you are able to control almost all of these options. So if you are working on a document in Word 2013, and notice something like a split-screen that displays two different sections of your document, then you might be looking for a way to disable that setting. Our guide below will show you how to remove the split view in Word 2013.
How to Get Rid of the Dual Window Split Screen in Word 2013
Our guide continues below with more information on how to enable or disable the split-screen in Microsoft Word, including pictures of these steps.
How to Exit the Split View in Word 2013 (Guide with Pictures)
The steps in this article were performed in Microsoft Word 2013. This article assumes that you are currently working on a document in Word 2013 and that you are currently seeing a window that is vertically split in half by a horizontal line. There should also be a ruler underneath the horizontal line that is splitting the window. These steps are going to remove that split and restore your document to a view where you only see one view of your document.
Step 1: Open Word 2013.
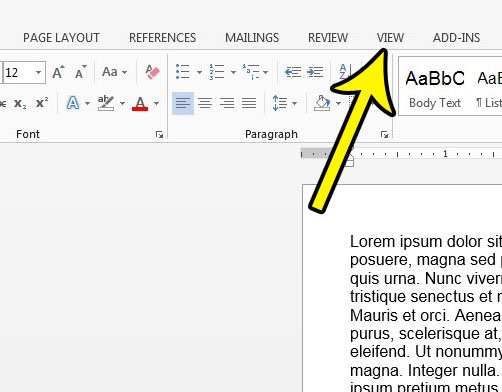
Step 2: Click the View tab at the top of the window.
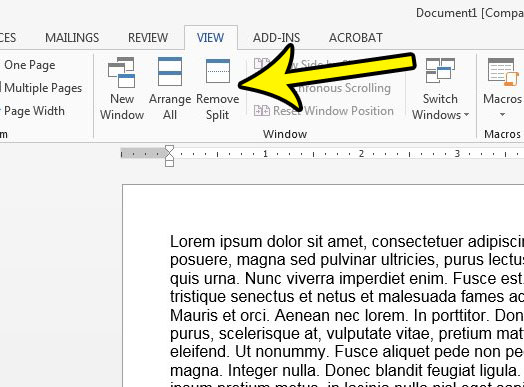
Step 3: Click the Remove Split button in the Window section of the ribbon.
Our tutorial continues below with additional discussion about changing display settings in Microsoft Word.
More Information on How to Get Rid of Side By Side Pages in Word 2013
When you are on that View tab you will see some other options in the Window group that might be useful if you need to customize the look of the Word canvas. These options include:
New Window Arrange All Remove Split (or Split, depending on whether it’s active or not) View Side by Side Synchronous Scrolling Reset Window Position
One of the other window settings that someone might use in Microsoft Word happens when there are multiple documents open. This could be because they are working on two documents at the same time, but it can also be due to comparing different document versions. If so, then using or turning off the “View Side by Side” option is something that is useful to know. There is also a Page Movement group on the View tab where you can switch between Vertical or Side to Side. if you are trying to figure out how to get rid of side by side pages in Word, then going from the Side to Side option back to the Vertical option might help you to fix that issue. Are there other people that are going to be looking at your document, and you would like to prevent them from making any changes to it? Learn how to restrict editing in Word 2013 so that only someone with a password you select will be able to unlock and edit the content of the document.
He specializes in writing content about iPhones, Android devices, Microsoft Office, and many other popular applications and devices. Read his full bio here.


